Qt comes with a QTreeWidget class which can be used to show data in a tree view. It can be used to show hierarchical data using either Model/View framework or by manually creating the hierarchy. The QTreeWidget supports multi-columns for each row and also allows editing of the individual cells. However, sometimes we need to present a QWidget in a cell to allow user to interact with data. For example, we might want a user to choose a Boolean value for a cell and instead of asking the user to type Yes/No or True/False, we can present the user with a checkbox. This eliminates human errors in type the values. Often, there is also a need to embed a QPushButton within a cell to allow user to run some action.
Let’s dig in a single example on how to embed a QWidget in a cell of a QTreeWidget.
// Create a tree widget with three columns.
QTreeWidget* treeWidget = new QTreeWidget();
treeWidget->setColumnCount(3);
QStringList columnNames;
columnNames << "Column 1" << "Column 2" << "Column 3";
treeWidget->setHeaderLabels(columnNames);

// Add a top level tree widget item.
QTreeWidgetItem* item = new QTreeWidgetItem();
treeWidget->addTopLevelItem(item);

// Add a check box to the second column.
QCheckBox* checkBox = new QCheckBox("Click Me!");
treeWidget->setItemWidget(item, 1, checkBox1);

// Add tree widget to the parent widgets layout.
this->setLayout(new QVBoxLayout());
this->setContentsMargins(0, 0, 0, 0);
this->layout()->addWidget(treeWidget);
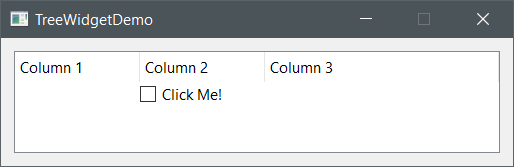
The above code produces the output as shown in the below image. The check box is left aligned and QTreeWidget does not offer a way to center or right align it out of the box. A standard solution offered online is to inherit from QTreeWidgetItem and take control of painting the item directly.
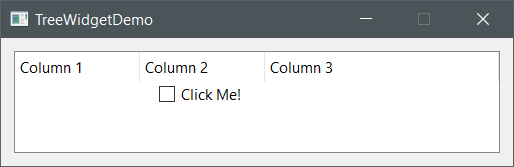
Inheriting from QTreeWidgetItem is unnecessarily complicated and there is no need to do it. A simpler way is to put the checkbox in another widget and use a horizontal layout with stretch before and after the checkbox! This trick can be used to right align as well by omitting the stretch before the checkbox. Here is the code:
// Create a check box.
QCheckBox* checkBox = new QCheckBox("Click Me!");

// Put the check box in a wrapping widget with appropriate layout.
QWidget* checkBoxWrapper = new QWidget;
QHBoxLayout* layout = new QHBoxLayout();
layout->addStretch();
layout->addWidget(checkBox);
layout->addStretch();
layout->setContentsMargins(0, 0, 0, 0);
checkBoxWrapper->setLayout(layout);

// Add it to the tree widget.
mTreeWidget->setItemWidget(item, 1, checkBoxWrapper);
This code is going to produce the following output:
The complete Visual Studio 2019 solution for this demo can be downloaded here.
Without the call to ‘layout->setContentsMargins(0, 0, 0, 0);’ this trick doesn’t work for some reason…the blank container widget appears empty…so I appreciate that shown in your example. Thank you. –kh;